How To Rename Multiple Files Of A Folder In Excel?
If there are multiple files that you want to rename, first, you can list the old file names in a column of worksheet, and then enter the new filenames that you want to replace with. To quickly list all files in worksheet, you can use the Kutools for Excel’s Filename List utility.
1. Click Enterprise > Import / Export > Filename List, see screenshot:
2. In the
Filename List dialog box, click

button to choose the file folder that you want to list the files, and then click
All files from the
Files type, see screenshot:
3. Then click OK button, all the filenames have been list in a column of a new worksheet, as well as some file attributes, and now, you can delete other unwanted columns and only leave the File Name column, see screenshot:
Rename Multiple Files Of A Folder In Excel With VBA Code
After listing all original filenames in one column A, and you should type new filenames in column B as following screenshot shown:
And here I will talk about a VBA code which may help you to replace the old filenames with the new filenames at once. Please do with following steps:
1. Hold down the ALT + F11 keys, and it opens the Microsoft Visual Basic for Applications Window.
2. Click Insert > Module, and paste the following macro in the Module window.
1
2
3
4
5
6
7
8
9
10
11
12
13
14
15
16
17
18
19
20
21
22
23
|
Sub RenameFiles()
Dim xDir As String
Dim xFile As String
Dim xRow As Long
With Application.FileDialog(msoFileDialogFolderPicker)
.AllowMultiSelect = False
If .Show = -1 Then
xDir = .SelectedItems(1)
xFile = Dir(xDir & Application.PathSeparator & "*")
Do Until xFile = ""
xRow = 0
On Error Resume Next
xRow = Application.Match(xFile, Range("A:A"), 0)
If xRow > 0 Then
Name xDir & Application.PathSeparator & xFile As _
xDir & Application.PathSeparator & Cells(xRow, "B").Value
End If
xFile = Dir
Loop
End If
End With
End Sub
|
3. After pasting the code, please press F5 key to run this code, and in the Browse window, select the folder which you want to change the filenames in, see screenshot:
4. And then click OK, all the old filenames have been replaced by the new filenames immediately. See screenshots:
Notes:
1. When you list your old and new filenames, the file extension must be included.
2. In the above code, the reference A:A indicates the old filenames list you want to rename, and reference B contains the new filenames that you want to use, you can change them as your need
-----------------------------------------------------------------------------------------------------------------------------
How to Convert Date Format in Excel mm/dd/yyyy to dd/mm/yyyy
How To Convert Dd/Mm/Yyyy To Mm/Dd/Yyyy In Excel Cells?
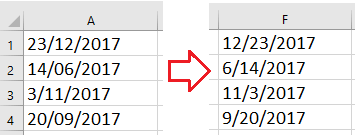
In Excel, the standard date format is mm/dd/yyyy, but in some cases, the dates in the files you received or import are in the format dd/mm/yyyy, how can you change these dates from dd/mm/yyyy format to mm/dd/yyyy in Excel as below screenshot shown?
Convert dd/mm/yyyy to mm/dd/yyyy with Formulas
Convert dd/mm/yyyy to mm/dd/yyyy with Text to Column
Convert Dd/Mm/Yyyy To Mm/Dd/Yyyy With Formulas
There is a formula that can quickly convert dd/mm/yyyy to mm/dd/yyyy date format.
Select a blank cell next to the dates you want to convert, type this formula =DATE(VALUE(RIGHT(A9,4)), VALUE(MID(A9,4,2)), VALUE(LEFT(A9,2))), and drag fill handle over the cells which need to use this formula.

Note: A9 is the date you use to convert.
Convert Dd/Mm/Yyyy To Mm/Dd/Yyyy With Text To Column
Also, you can split the date format into columns by the Text to Columns feature, and then combine with a formula with the new order.
1. Select the dates you want to convert, and click Data > Text to Columns. See screenshot:

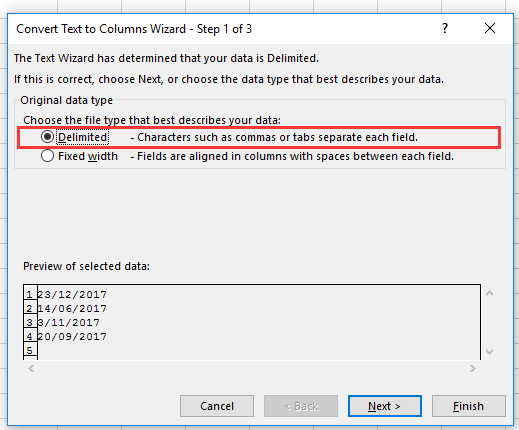
2. In Step 1 of Convert Text to Columns Wizard, check Delimited option. See screenshot:
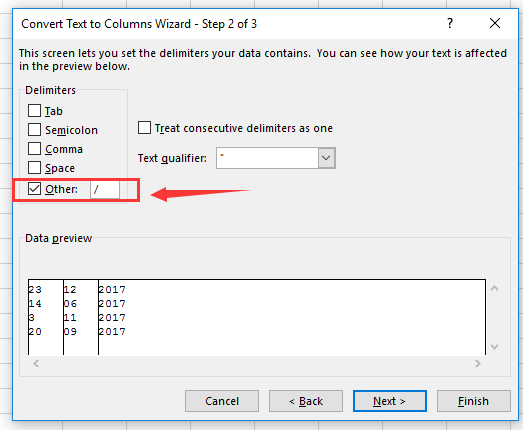
3. Click Next, and check Other, and type / into the next to text box. See screenshot:
4. Click Next, and select a cell to output the data in Destination box. See screenshot:
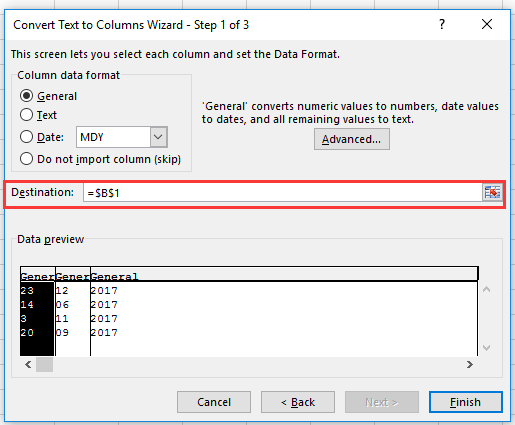
5. Click Finish. Then the dates have been split into columns.
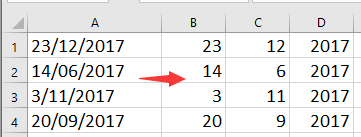
6. Select a blank cell, and type this formula =C1&"/"&B1&"/"&D1, drag auto fill handle down to the cells needed this formula.
Note: In the formula, C1, B1 and D1 are the delimited cells.
Relative Articles:
Courtesy: https://www.extendoffice.com/documents/excel/4646-excel-convert-dd-mm-yyyy-to-mm-dd-yyyy.html#a1
Script for downloading all the google drive links in excel spreadsheet
Google Apps Script to download files from Google Drive links listed in a Google Sheet. This script uses the Google Drive API to fetch the files and save them to a specific folder in your Drive.
Steps to Set Up the Script:
- Open your Google Sheet that contains the Google Drive links.
- Go to Extensions > Apps Script.
- Replace the default script with the code below.
- Save the script, give it a name, and then click Deploy > Test Deployments to run it.
Apps Script Code:
function downloadDriveLinks() {
// Spreadsheet setup
const sheet = SpreadsheetApp.getActiveSpreadsheet().getActiveSheet(); // Use the active sheet
const linkColumn = 1; // Column A (adjust if links are in a different column)
const startRow = 2; // Assuming the first row contains headers
// Drive folder to save files
const folderName = "Downloaded Files"; // Change this as needed
const folder = getOrCreateFolder(folderName);
// Iterate through rows
const range = sheet.getRange(startRow, linkColumn, sheet.getLastRow() - startRow + 1, 1);
const links = range.getValues();
for (let i = 0; i < links.length; i++) {
const link = links[i][0];
if (!link) continue; // Skip empty rows
try {
const fileId = extractFileId(link);
if (fileId) {
const file = DriveApp.getFileById(fileId);
const copiedFile = file.makeCopy(file.getName(), folder);
Logger.log(`Downloaded: ${copiedFile.getName()} to folder ${folder.getName()}`);
sheet.getRange(startRow + i, linkColumn + 1).setValue("Downloaded"); // Mark status in next column
} else {
throw new Error("Invalid link format");
}
} catch (e) {
Logger.log(`Failed to download link at row ${startRow + i}: ${e.message}`);
sheet.getRange(startRow + i, linkColumn + 1).setValue("Failed"); // Mark status in next column
}
}
}
function extractFileId(link) {
// Extract file ID from a Google Drive link
const idRegex = /[-\w]{25,}/; // Regex to match file ID
const match = link.match(idRegex);
return match ? match[0] : null;
}
function getOrCreateFolder(folderName) {
// Check if the folder exists or create a new one
const folders = DriveApp.getFoldersByName(folderName);
return folders.hasNext() ? folders.next() : DriveApp.createFolder(folderName);
}
Script Explanation:
Input Details:
- The script assumes your Google Sheet has Drive links in Column A, starting from Row 2. Adjust
linkColumn and startRow as needed. - Add a status column (e.g., Column B) to indicate "Downloaded" or "Failed".
Folder:
- All files will be saved in a folder named
Downloaded Files. Change the folder name in the folderName variable.
How It Works:
- The script reads links from the spreadsheet.
- Extracts the file ID using a regex.
- Downloads the file to a specified folder in your Drive.
Status Update:
- Updates the corresponding row with either "Downloaded" or "Failed" in the next column.
Running the Script:
- To run the script, click on the play ▶️ button in the Apps Script editor.
- Grant the required permissions when prompted.
Notes:
- Ensure the Drive links are either "Anyone with the link" or "Anyone in the organization" can view or edit.
- You can schedule this script to run automatically using Triggers in Apps Script.

 button to choose the file folder that you want to list the files, and then click All files from the Files type, see screenshot:


Comments
Post a Comment